
How to Unlock the Full Potential of Your Green Laser Pointer: Part 1
Introduction:
Imagine you’re stargazing on a clear, dark night, pointing out constellations to your friends. Your trusty green laser pointer‘s beam pierces the sky, tracing the outlines of mythical creatures and distant galaxies. But what if that beam could be even more brilliant, more powerful, and more versatile? What if you could modify your simple pointer into a tool that’s not just for presentations or play, but for exploration and education?
Green laser pointers, those handy devices that fit in your pocket, have become ubiquitous tools for educators, astronomers, and enthusiasts alike. They’re used in classrooms, lecture halls, and backyards across the world. But there’s a community of tinkerers and hobbyists who see beyond the standard use of these devices. They ask, “How can we make these lasers do more?”
In this comprehensive guide, we’ll delve into the world of green laser pointer modifications. From simple tweaks that can amplify the power to advanced modifications that can transform the functionality, we’ll explore how you can safely and effectively enhance your laser pointer. Whether you’re a seasoned modder or a curious newcomer, this post will illuminate the path to unlocking the full potential of your green laser pointer.
Understanding Your Green Laser Pointer
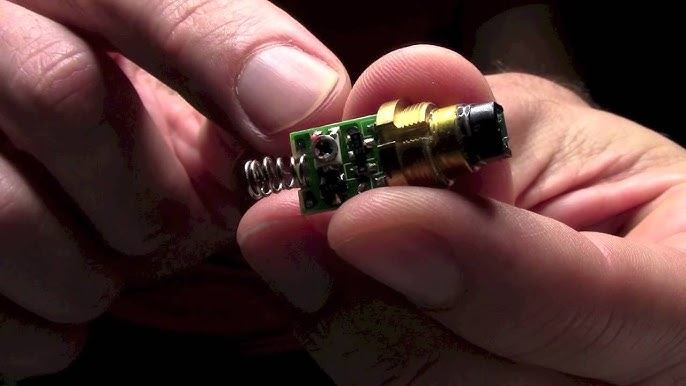
Before you start tinkering with your laser pointer, it’s crucial to understand how it works. A green laser pointer is more than just a battery and a light; it’s a symphony of components working in harmony to produce that vivid green beam.
At the heart of the pointer is the laser diode, which generates light through a process called stimulated emission. This light is then passed through a series of optical components, including a crystal that doubles the frequency of the light, turning it from invisible infrared to the green color we can see.
The driver circuit regulates the power supplied to the diode, ensuring that the laser emits a steady beam. The final piece of the puzzle is the optics, which include lenses that collimate the light, making the beam tight and focused.
Understanding these components is the first step in the modification journey. It’s like knowing the parts of a car before you tune it for performance. In the next sections, we’ll guide you through the safety measures to take before you start, the tools you’ll need, and the step-by-step process of modification.
Safety First
Before diving into the world of laser modifications, it’s imperative to address the elephant in the room: safety. Lasers, especially modified ones, can be dangerous if not handled with care. The bright beam that makes lasers so appealing is also what can make them hazardous. Here are some essential safety tips to keep in mind:
- Understand Laser Classes: Lasers are categorized into different classes based on their power output and potential to cause harm. Most green laser pointers are Class 3R or 3B, which can be harmful if viewed directly. Familiarize yourself with these classifications and the safety measures required for each.
- Wear Proper Eye Protection: Always wear safety goggles that are rated for the wavelength of your laser. Even a stray reflection can cause permanent eye damage, so this is not a step to be taken lightly.
- Create a Safe Workspace: Modify your laser in a well-lit, clutter-free area where you have control over the surroundings. Ensure that there are no reflective surfaces around that could inadvertently bounce the laser beam.
- Never Point at Living Targets: Never direct the laser beam at people, animals, or any living thing. The focused energy of a laser can cause burns and irreversible damage to eyesight.
- Be Aware of Your Environment: Be mindful of where the beam is pointing at all times, especially outdoors. Avoid pointing lasers at aircraft, vehicles, or any other place where you could distract or harm someone.
- Stay Informed on Legal Regulations: Modifying a laser pointer may change its class and could make it illegal to use in public spaces or without proper authorization. Check your local laws to ensure you’re not inadvertently breaking any.
- Handle with Care: When disassembling and reassembling your laser pointer, handle all components with care. Not only are some parts delicate, but improper handling could also lead to a malfunction that might compromise safety.
By respecting these safety guidelines, you can ensure that your foray into laser modifications is both enjoyable and secure. With safety considerations out of the way, we can move on to the tools and materials you’ll need to start your modification project.
Tools and Materials
Equipping yourself with the right tools and materials is like having a good map before a journey—it makes the path to your destination clearer and the journey smoother. Here’s what you’ll need to gather before you start modifying your green laser pointer:
- Safety Goggles: As mentioned earlier, safety goggles that are rated for the specific wavelength of your laser are non-negotiable. Make sure they are certified and provide adequate protection.
- Precision Screwdrivers: Many laser pointers are assembled with small screws that require precision screwdrivers to remove without stripping.
- Extraction Tool: As seen in the video by Zenodilodon, an extraction tool can be invaluable. You can either purchase one or make your own following the guidelines provided in the video.
- Soldering Iron: If you’re planning to modify the driver circuit or replace components, a soldering iron with a fine tip is essential.
- Multimeter: To test electrical connections and ensure the components are functioning correctly, a multimeter is a must-have.
- Thermal Paste: If you’re dealing with high-powered lasers, managing heat with thermal paste can prolong the life of the laser diode.
- Adjustable Power Supply: For testing your modifications without draining batteries, an adjustable power supply is very useful.
- Lens Kit: Having a set of lenses with different focal lengths gives you the ability to adjust the focus and shape of the beam.
- Tweezers and Pliers: These will help you handle small parts and manage wires without causing damage.
- Clean Workspace: A clean, organized workspace is crucial. It should be free from dust and clutter to avoid contaminating the laser components.
- Laser Housing: If you’re planning to build your laser from scratch or replace the housing, having a durable and appropriately sized housing is important.
- Replacement Parts: Depending on your modification goals, you may need various replacement parts such as a new laser diode, driver circuit, or additional heatsinking.
- Documentation: Keep a notebook or digital document to record your steps, settings, and any changes you make. This can be invaluable for troubleshooting and repeating successful modifications.
With these tools and materials at your disposal, you’re well-prepared to start the modification process. Remember, the quality of your tools can affect the quality of your modifications, so invest in good equipment where possible.
In the next section, we’ll dive into the modification process itself, guiding you through each step with precision and care to help you achieve the enhanced performance you’re seeking from your green laser pointer.
The Modification Process
With your workspace set and your tools at the ready, it’s time to embark on the actual modification of your green laser pointer. This process requires patience, precision, and a steady hand. Follow these steps to modify your laser pointer for better performance:
- Disassembly:
- Begin by carefully disassembling your laser pointer. Use the precision screwdrivers to remove any screws. If the pointer is glued together, as many are, you may need to gently heat the seams to loosen the adhesive.
- Document each step of the disassembly process. Take photos or make sketches of the component layout to aid in reassembly.
- Diode and Driver Access:
- Once you have access to the internal components, locate the laser diode and driver circuit. These are the heart and brain of your laser pointer, respectively.
- If you’re planning to replace the diode for one with a higher power output, desolder the old diode carefully and solder in the new one, ensuring not to overheat the diode.
- Optics Adjustment:
- The collimating lens focuses the laser beam. Adjusting or replacing this lens can change the beam’s characteristics. Experiment with lenses from your lens kit to achieve the desired focus.
- Be mindful of the lens’s orientation; reversing a lens can dramatically alter the beam’s focus.
- Heat Management:
- High-powered lasers generate more heat. Apply thermal paste between the diode and any heatsinks to improve heat dissipation.
- Consider adding additional heatsinking if the current setup doesn’t adequately manage the increased heat.
- Driver Circuit Tuning:
- The driver circuit controls the current supplied to the diode. Adjusting the potentiometer (if available) can increase the current, but be cautious not to exceed the diode’s maximum current rating.
- If you’re experienced with electronics, you might replace the driver circuit with one that allows for higher current settings.
- Testing and Calibration:
- After making adjustments, use your adjustable power supply to test the laser’s output. Start with a low current and gradually increase to the desired level.
- Measure the output with a laser power meter if you have access to one, ensuring you’re within safe and legal limits.
- Reassembly:
- Once you’re satisfied with the modifications, reassemble the laser pointer. Refer to your documentation to ensure everything goes back in its place.
- Test the laser pointer again after reassembly to make sure all components are functioning correctly.
- Final Checks:
- Perform a final safety check to ensure the modified laser pointer operates as expected. Confirm that the beam is stable and that the housing is securely assembled.
- Double-check that all safety measures are still in place, such as the inclusion of an IR filter if your laser diode emits infrared light.
By following these steps, you should be able to enhance the performance of your green laser pointer safely and effectively. Remember, the goal is not just to increase power but to ensure stability and longevity of the laser pointer.
Click to proceed to the next article: “How to Unlock the Full Potential of Your Green Laser Pointer: Part 2“


Leave a comment